
Learning Tips:
–1. To learn and implement best? Have this page open in a tab at the top of your browser, and a tab open of the forum and in the page begun where you want to post a topic or reply. (You can have two tabs of the site open at the same time.)
–2. Watch our videos on how to do each task, and you can then see how easy and quick it can be!
–3. All the terms (such as formatting and highlighting) are covered below in a gradual manner. Take a few minutes to buzz through the different steps!
Posting Box Issues Covered Below:
–1. How to Single Space
–2. Starting a New Topic
–3. The Title
–4. Add Tags
–5. Writing Your Post
–6. Reply Posting Box
–7. Bolding
–8. Italics
–9. Underlining
–10. Combinations of Formatting
–11. Strikethrough Formatting”
–12. To Remove Formatting
–13. How to install a link in a Post
–14. Placing Emojis in a Post
–15. Inserting a Bullet-point list
–16. Inserting a numbered list
–17. Changing “Justification” for effect
–18. Adding color to text
–19. Changing font/text size
–20. Using the “Post Preview” feature
–21. How to install a GIF
–22. Installing a Picture into your Post
–23. How to load a Video into a Post
–24. Installing a Twitter Tweet
–25. How to Quote a single sentence or fragment
–26. Putting Quotes of single sentences from several posts into your Post
–27. Placing an entire post as a Quote in your Post
–28. Putting entire posts as multiple quotes in your Post.
–Starting a New Topic:
How to post in the Posting Box after clicking on the Yellow Button in the upper area of the forum “Start new topic.”
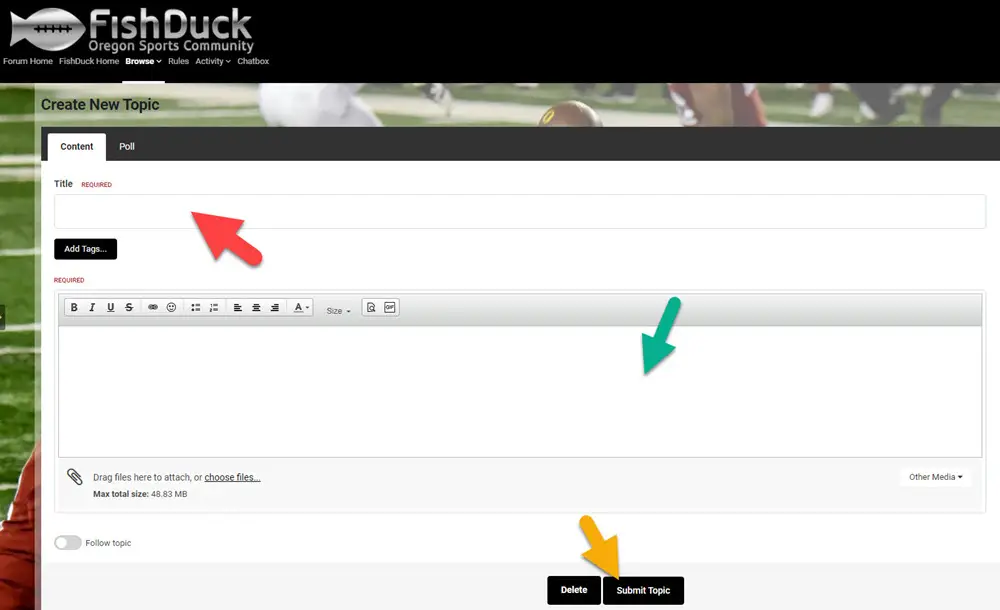
Above is what appears after you click on the yellow Start new topic button at the top of the forum on the upper right.
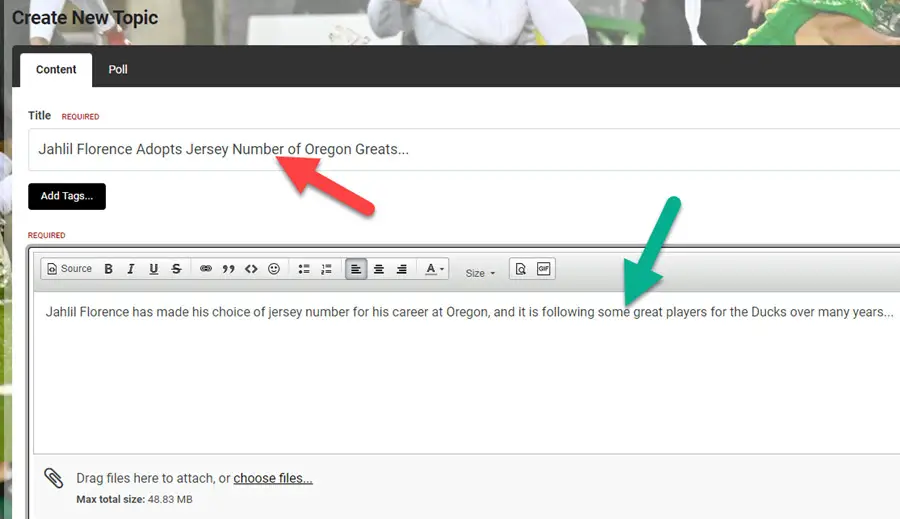
–The Title: (Very Important!)
–The red arrow above points to the field that contains the title of your post. Make it interesting, create something that makes people want to click and read your topic. It could be a quote from an article you are linking or referring to. Or an unusual ponder-point about your topic that makes people want to know more.
Why do I suggest title advice? I’ve been on a forum before where I was scanning the topic titles to see if anything interested me, (see how human nature works?) and I passed on a title about an article. Later on another forum a title to a topic about an article was intriguing, and I clicked on it and found that the article was superb and was glad I did not miss it. Yet I would have missed it on the other forum because of the boring title and it was the same article being linked.
So that Google can find our posts and suggest them, (that is how new people are finding us!) we describe what is in the post in our title and we use AP (Associated Press) style in capitalizing because it is easier to read and because Google likes it and is more likely to refer your post in a browser search. Capitalize the first letter of each word, except the inconsequential ones like, “is, a, the, and, etc.” An example…
We use AP Style in Titles so Google will Recognize Your Post and Suggest it!
Part of being committed to this community is all the little things for the benefit of all, and the same is true with these titles; make them easy to read with Associated Press capitalizing and make them sizzle for the enjoyment of everyone and have fun with it!
–Writing Your Post:
The green arrow above points to the area that you write your post in and you would keyboard as you would writing a document or an email. I will cover all the features that you can add in explanations below, (the symbols in the toolbar at the top of the Posting Box) and when you are done writing your post–click on the “Submit Topic” button (yellow arrow above) and it will be published. If you decide that you don’t have time to write the post you want, or realized you were about to break the rules we have (I’ve been there!) and wish to delete the post–the black button is available at the bottom of your post as you see above.

In this example of posting–it will be in a reply, but the Posting box is the same. (Well, a reply does not have a title because only a new topic has a title) Note above how at the bottom of a thread of a topic is a box ready for me to reply in. When you click in the box next to the red arrow, what you see below appears…
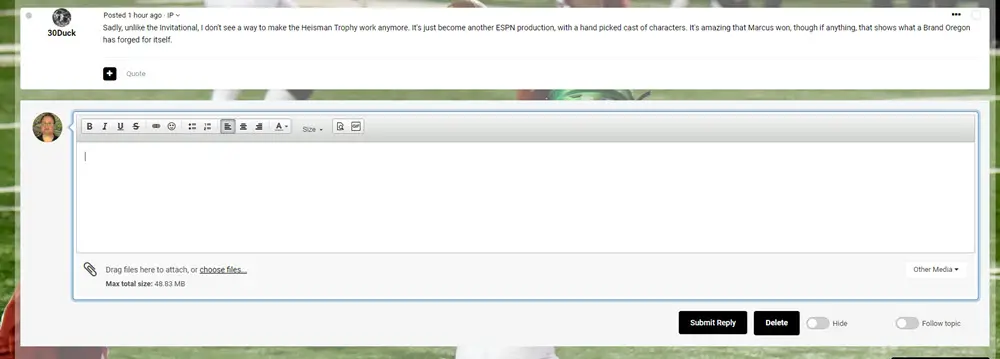
–Toolbar Features in the Posting Box:
Note that 30Duck’s post is above mine, just like before only now the Reply Posting Box appears after I clicked next to the red arrow above. I can keyboard my thoughts in the Posting Box, but
–Learn How to Add Formatting (Bolding, Italics, Underlining, etc.)
Let’s look at the symbols at the top of the Posting Box called the “Toolbar” and discern how to use these cool features!
Bear with me, because there are people who do not know how to do this and I want everyone to be able to have fun posting and adding emphasis to points they are making. The process of adding bolding, italics and underlining is called formatting, and legendary FishDuck Editor, Bob Rodes in Manchester Tennessee says that, “Charles, you are a fool-for-formatting.” Guilty as charged! I do love adding formatting to nearly everything I write! Let’s learn how…
–Bolding:
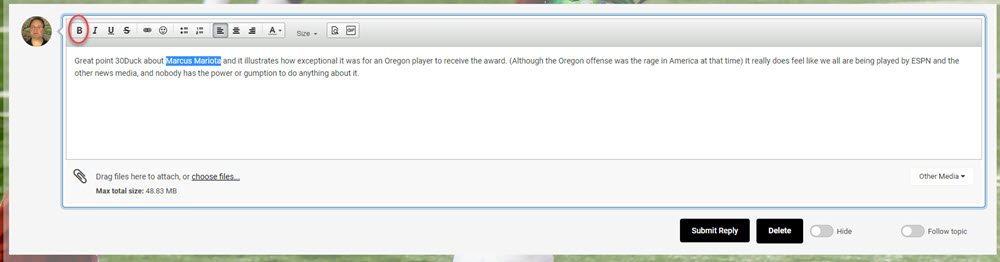
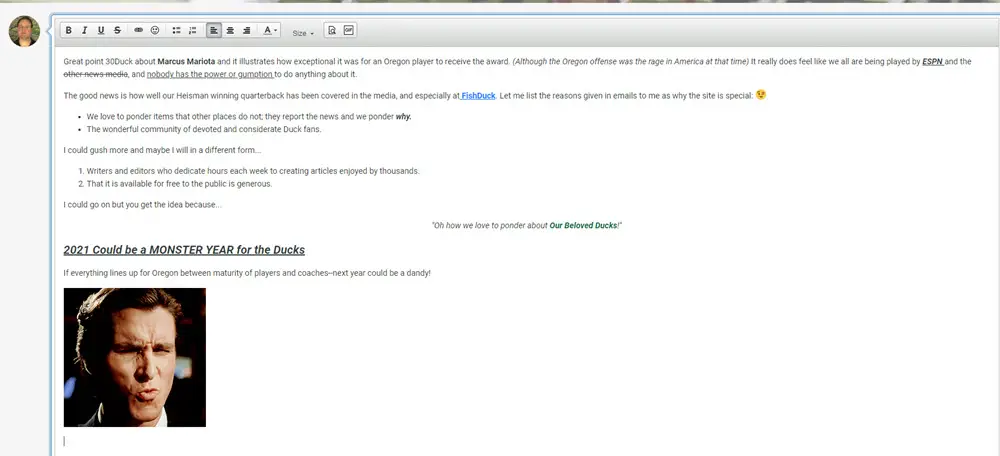
In the Associated Press (AP) journalistic style we use in FishDuck articles, it is required to bold names of people the first time the name appears. We don’t have to in a forum, but if there was ever a name for a Duck fan to add bolding to, Marcus Mariota is it! To bold his name (above) you place your cursor right at the end of his name, left-click and drag over the name and stop and let up on the click once you have finished highlighting his name. (If you have not done this before–it takes a little experience to know when you let up on the left-click.)
After you have covered his name and the shading over the name appears–this is called “highlighting,” as you have highlighted Mariota’s name. The next step after highlighting is to click the bolded “B” you see in the red circle above at the top of the Posting Box and in the toolbar. Then you click anywhere in the open area to set the bolding, so that the name is now bolded.
Look at the yellow arrow above and see that Marcus Mariota is bolded as planned.
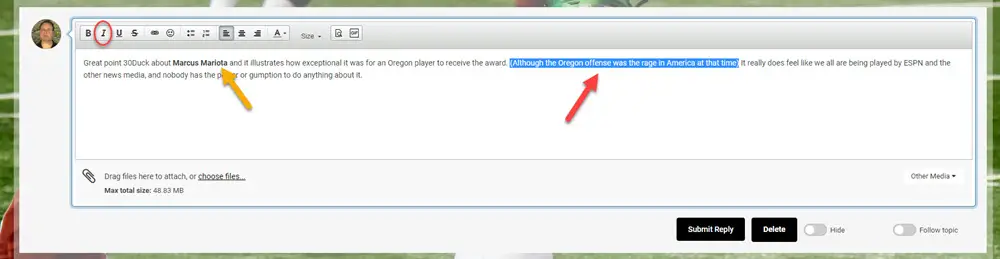
–Adding Italics:
Note how I’ve highlighted with a red arrow above an area in parentheses, and I plan to add italics to that by first highlighting the area and then clicking on the “I” in the red circle above. Click anywhere in the open area after you have highlighted and clicked on the Italics button (red circle) to set the italics, and you will now see that area previously highlighted in italics now. Easy!
–Underlining:
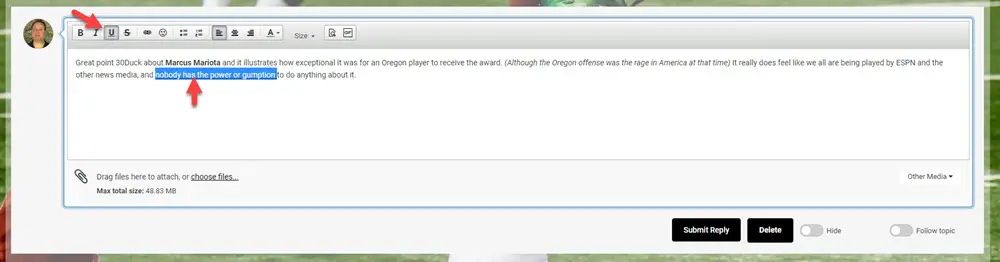
Note above how I highlighted the set of words I wanted underlined and then clicked on the “U” button the Posting Box toolbar. Now click anywhere in the open area to set it, and the words will be underlined as intended.
–Combinations of Formatting:
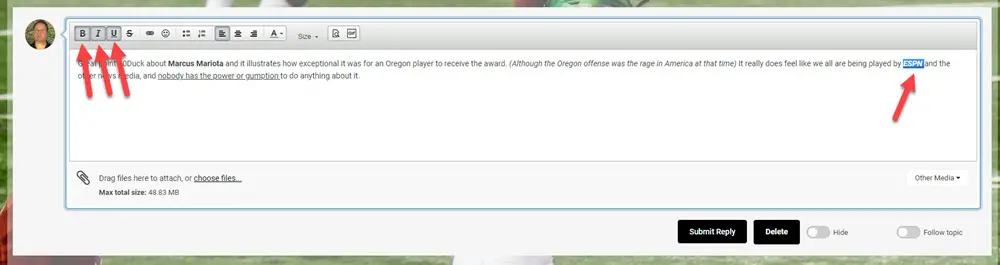
In our FishDuck articles, we will often link items and to indicate it we will use all three methods of formatting. Simply highlight what I want to be formatted, (Red arrow on ESPN above) and then click on all three formatting buttons of “B,” “I” and “U” in the Posting Box toolbar and then click in any open area to set it, and the highlighting will disappear and the ESPN will be formatted with all three options.
–Strikethrough Formatting:
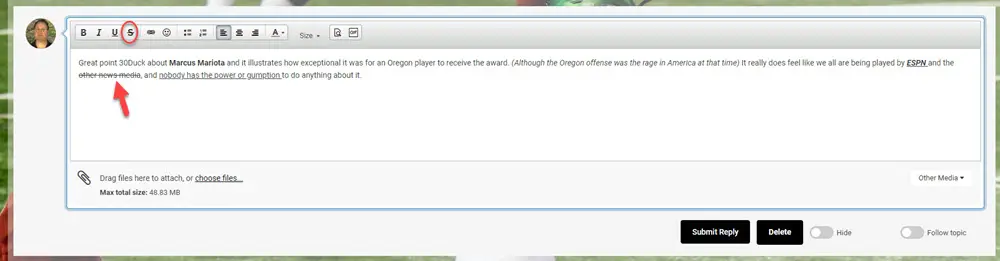
While it is used much less often, the strikethrough formatting can make a point at times. To accomplish what you see above with the red arrow, you highlight the words you wish to strikethrough, and then click on the “S” on the toolbar of the Posting Box, and then click in an open area when done to set it, and bingo…you are done. Very easy…
–To Remove Formatting?
Simply highlight the words formatted and click on the symbols on the Posting Box toolbar of formatting you want removed. Then click in any open area to set the changes, and you are done!
–How to Bring an Article Link Into a Post:
My FishDuck Friends, I am going to show you a process that is longer than normal, but only takes in total two minutes and forty seconds is all. The reason is because we want these posts to help the reader know what he/she is clicking into and yet also be entertaining to everyone. Each step below is easy, and once you got it–you will do it all in seconds per step. (I know as I’ve done it a few hundred times!)
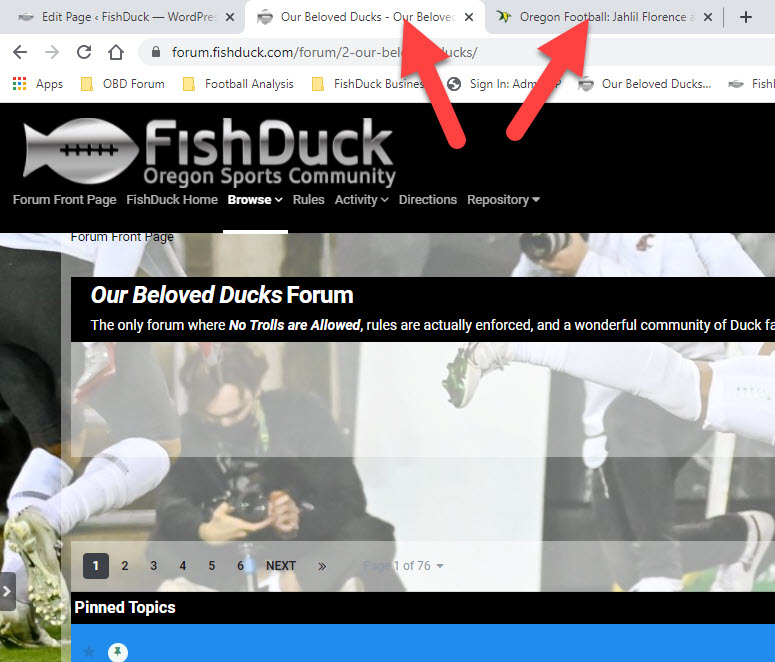
First, have the tab, (page) you are on next to another tab or page of the article you wish to link. (Red arrows above)
Next….if you are starting a new topic…please give it a great title that makes people want to click. (Red arrow above) I looked at the article and came up with something intriguing to place in the title, but it must not be “bait-and-switch,” but actually something that is true about the article. I will often take a quote out of the article and place it in “quote” just like that, and people enjoy seeing it in the article later. Come up with something enticing…please. (Again this is for Search Engines)
Please also capitalize every word in the title except words like, “of, the, and, a, is, etc.” That is Associated Press style, and is what Google likes, thus if you do it right…your post will be in the search engines and thousands could find your post.
Since this is a free site–we ask you to take the extra two minutes to do this for the benefit of everyone else! (This is how new members find us)
The green arrow above points to an introductory sentence about the article that is accurate, yet again–makes them want to click. This is also being considerate to our fellow members as people want to know about something–at least a little before they will click on it. Give us a great one!
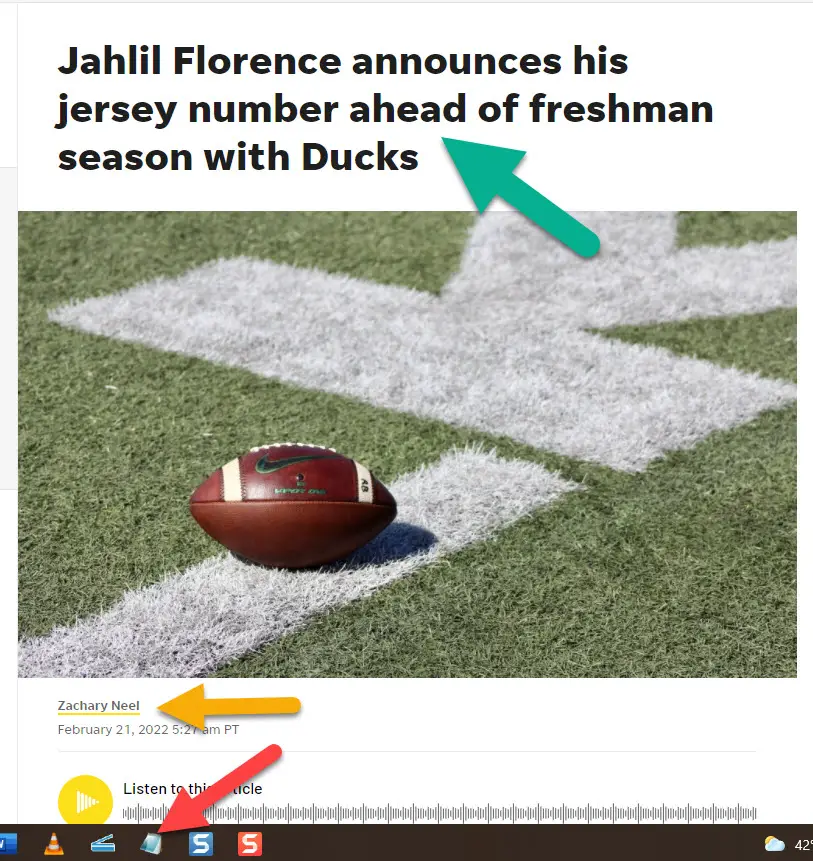
First note how the title has tons of non-capitalized words, and how big the text size is. Note also the name of the writer and the website, (Ducks Wire) and look at the red arrow pointing to an icon on my toolbar on my computer. That is Notepad on PC, and on a Mac it is Text-Edit, and these programs will wipe out excess code when you bring them over so the title letters won’t be monstrous and create additional trouble in the post by bring excess code over. (Check the directions underneath these instructions for putting an icon of either of these programs on the bottom toolbar or dock of your computer. Once installed, it is a snap to pull it up and use it in seconds as I do many times every day)
Doing what I am about to explain only takes seconds once you learn…as we copy the title off the page….
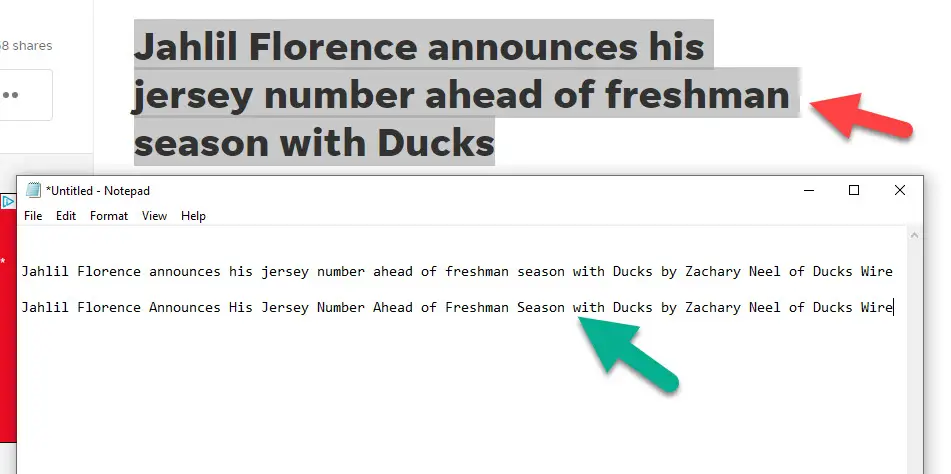
After you copy the title from the article, (red arrow above) and paste the title into Notepad or Text-Edit, (green arrow) you then add the author name and the site it is from. Then take 30 seconds to capitalize all the primary words, and note how much better the second example looks, which is why Google and other search engines recommend titles that have this AP style.
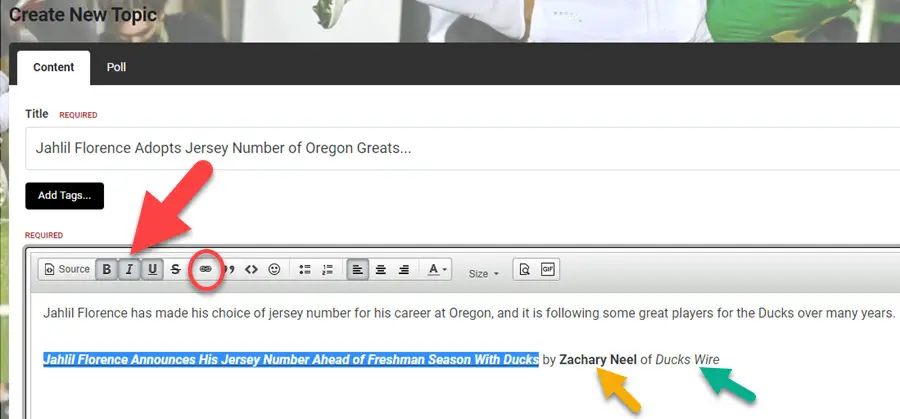
When it comes to the formatting, we bold the name of the author, (yellow arrow above) and add italics to the name of the site. (green arrow above) Then we highlight the title of the article and add three forms of formatting, (red arrow above) of bolding, adding italics and underlining.
The next step is to click on the toolbar where you see a red circle a chain link, or link above. A small window will pop up, and leave that for a moment and go to the tab that has the article to be linked…
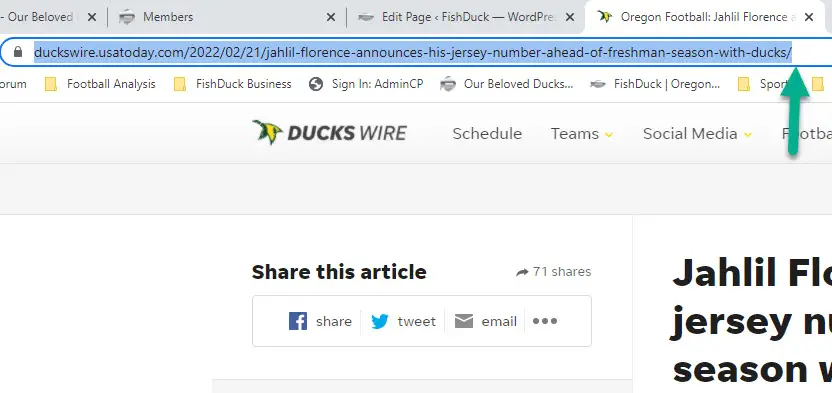
You click at the very end of the URL, the address of the website that has the article, (green arrow above) and now it will be highlighted. Copy this URL…
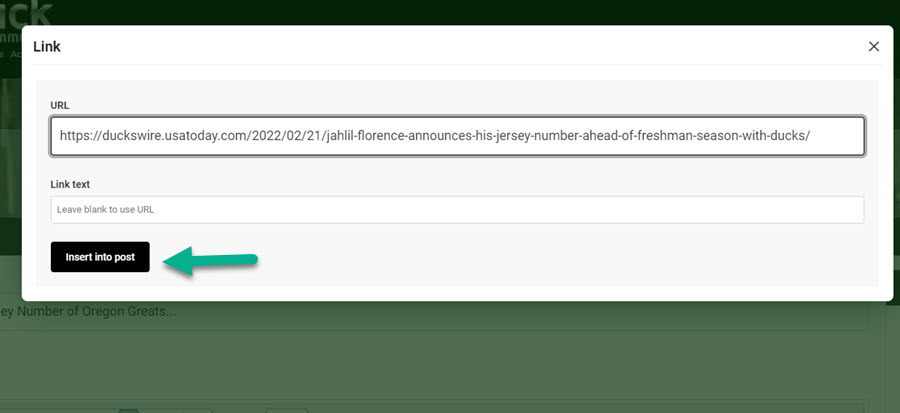
Now paste the URL into the long field in the box that says, “URL” above it and then click on “Insert into post.”
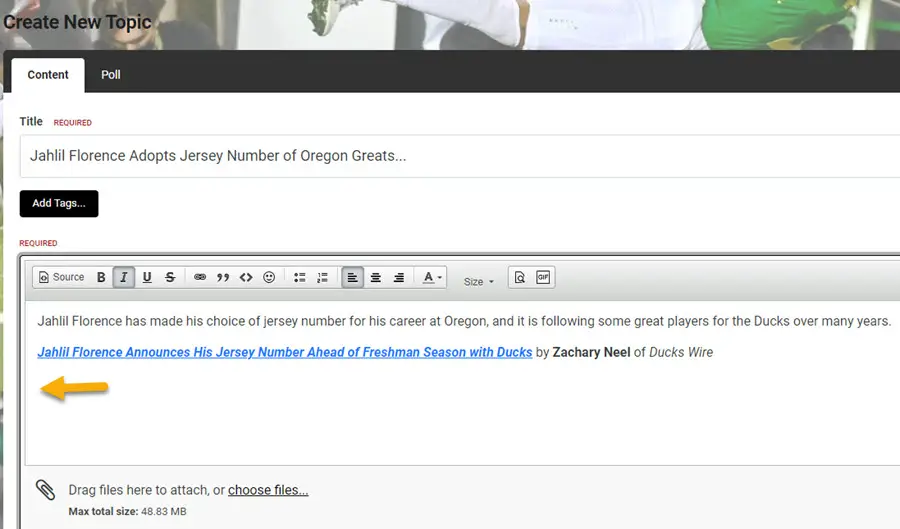
Now put your cursor at the end of the site name, (Ducks Wire above) and then hit Enter or Return twice to end up where the yellow arrow is above. Now we go get a picture!
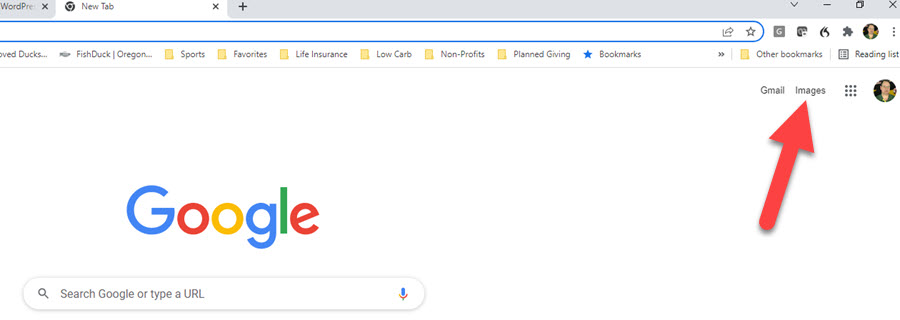
Open a new tab and go to Google as a search engine, and then go up to the right corner and click on “Images” as you see above with the red arrow. A search box will appear and you type in the name of the player and add “Oregon Football” or “Twitter.” In this case I keyboarded in, “Jahlil Florence Twitter.”
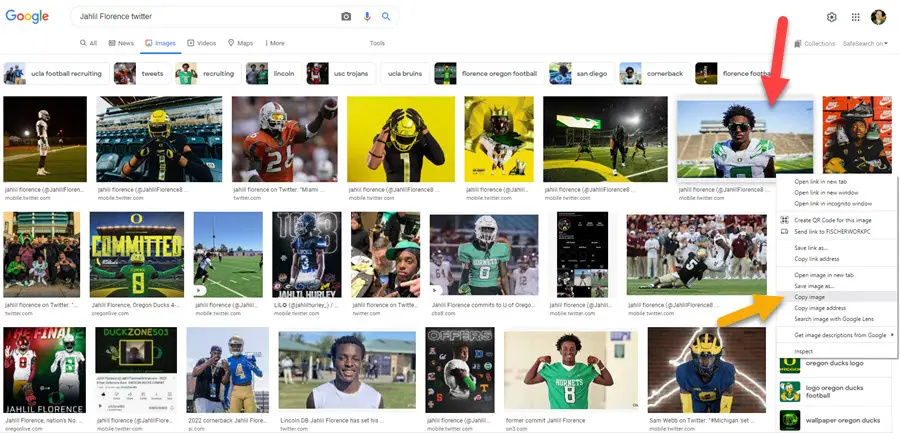
As you see–there are a ton of choices and you can put any in the post to add interest, as we do not have copyright issues in a forum. I selected the one indicated by the red arrow above, and then right clicked on the picture, and then clicked on “Copy Image.” (yellow arrow above)
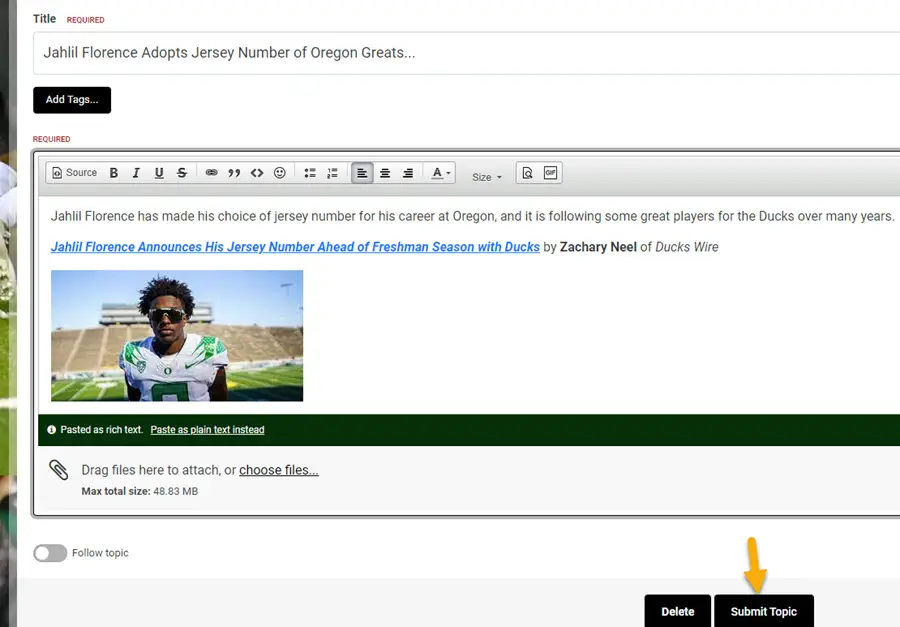
All you have to do is paste in at the spot we placed the cursor and bam! We have a picture in the post within 10 seconds…so easy! Click on “Submit Topic,” (yellow arrow above) and the post is finished!
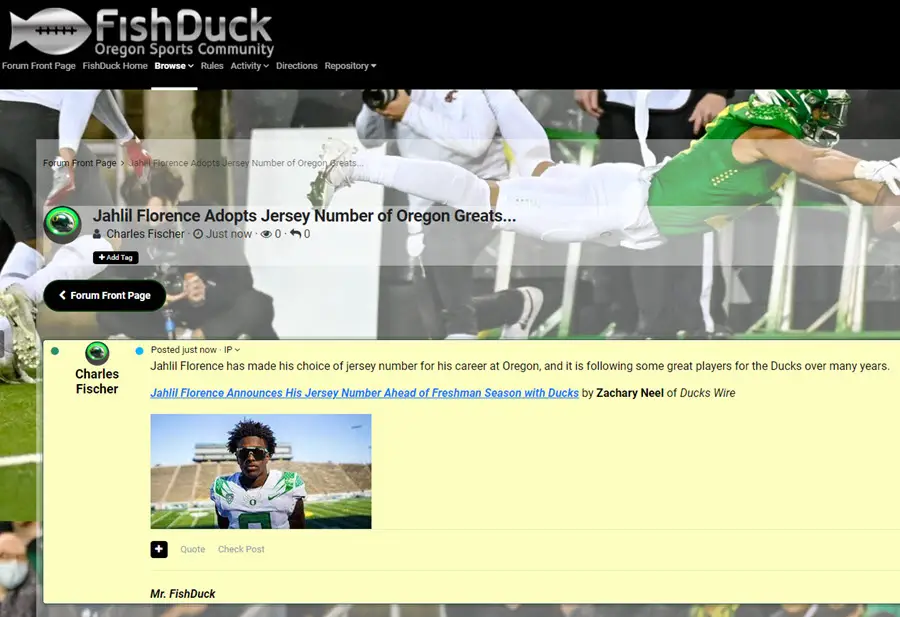
Now look at that post….it is not a dud title with a raw link, but a provocative title with an introductory sentence that beckons them to check it out. Then we provide the actual title of the article so they can decide if this is something they want to read, in addition to the author and website which may also help in that decision-making process.
Add the picture with increases the interest 100%, and you have an attractive, professional looking post that takes less than three minutes to do. If you could do two-three of these a day to help the site while I’m working? It would not take much time…
And we attract Google to your post, which attracts more good people like you to this free forum. I promise you–I spent a TON more time creating these directions and once you do this–you will zip through the steps.
–How to Link an Article or Website to a word or set of words in your post.
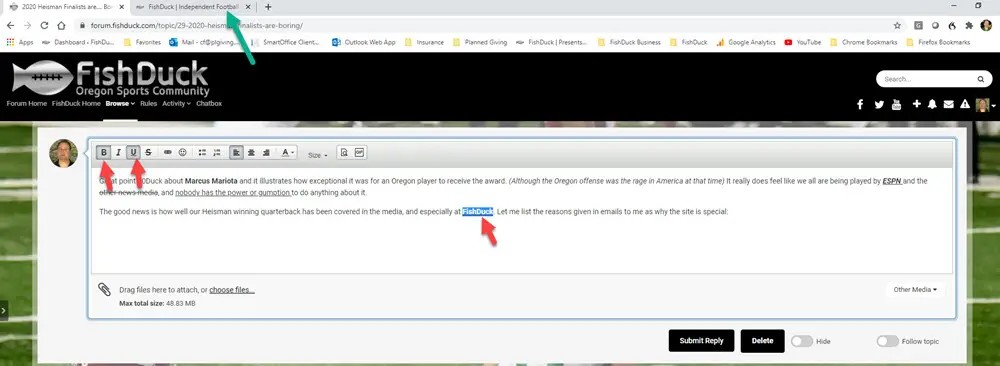
The first thing to do is have the article or site you are going to link ready in a tab at the top. (Green arrow above) Then highlight the word or set of words that will contain your link that people will click on and both bold it and underline it in order to make it obvious that it is a link. (See red arrows above)
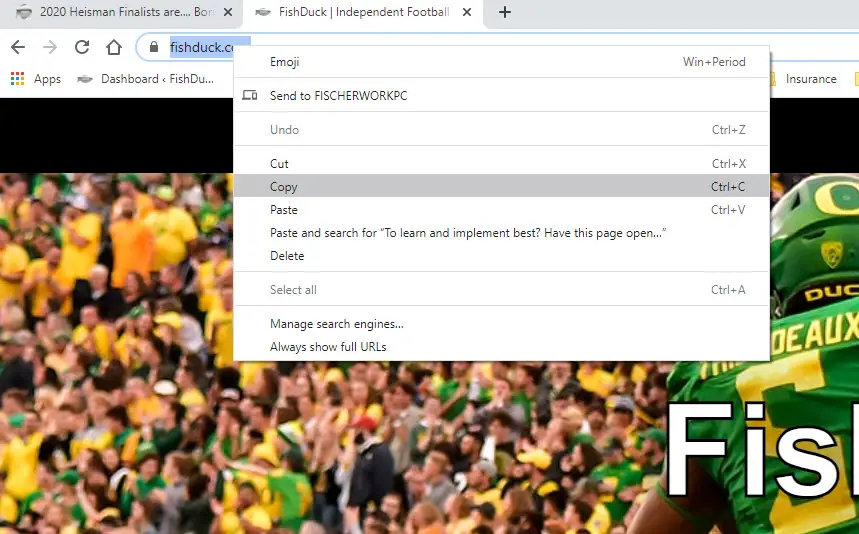
Now you click on the tab at the top that has the site or article you want to link. We want to copy the URL, or the address on the web the site or article resides and you would highlight as before all that is in the URL address bar that you see highlighted at the top. A quick way to highlight a URL is to click at the very end on the right of the URL and it will all highlight without having to sweep it. But both methods work!
Then you right click on the URL as you see above and then select the “Copy” option and click on it. The box disappears and your computer has now saved that URL.
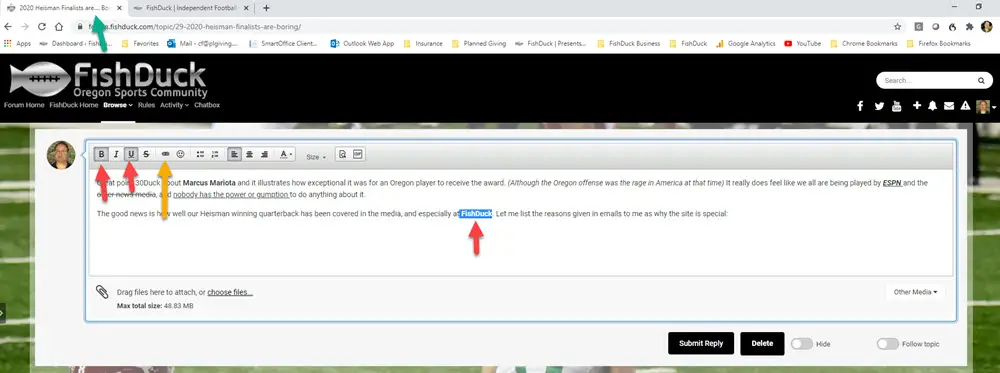
Note with the green arrow above that we now go back to the other tab we began with, and we have the word bolded and underlined (Red arrows above) and now it is time to add the link to it. Click on the chain symbol in the Posting Box toolbar, as a “link” is one part of a chain.
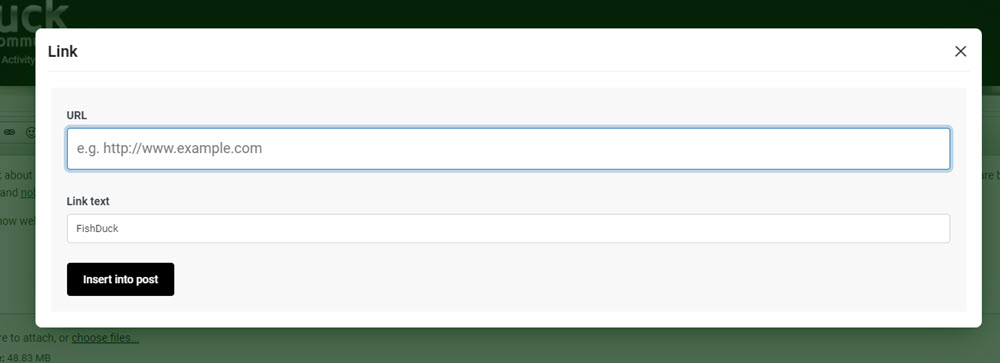
When you click on that link symbol, a box appears as you see above…
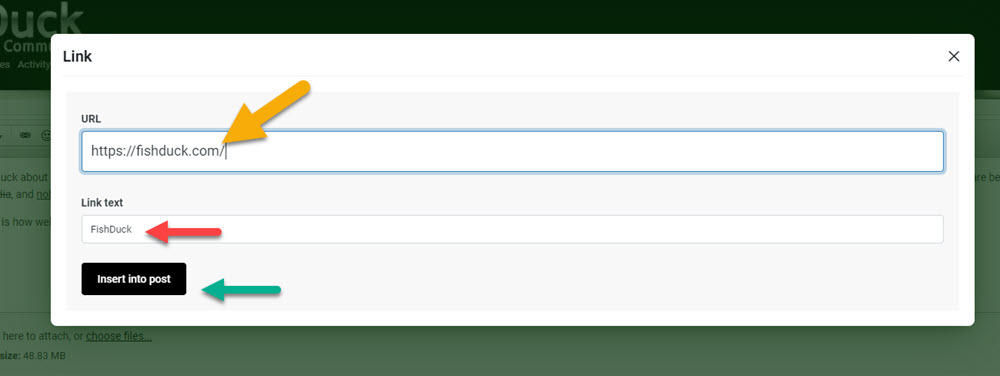
Place your cursor in the URL field and right click; an option of “Paste” is available and you select that. The menu box will disappear and the URL will appear in the URL box as you see above. Note that it shows in the “Link text” (Red arrow above) which word or words the link will be attached to. Then you simply click on “Insert into post” (Green arrow above) and the link is established!
When your post is done and submitted-your link will show up prominently.
–Placing Emojis into a Post
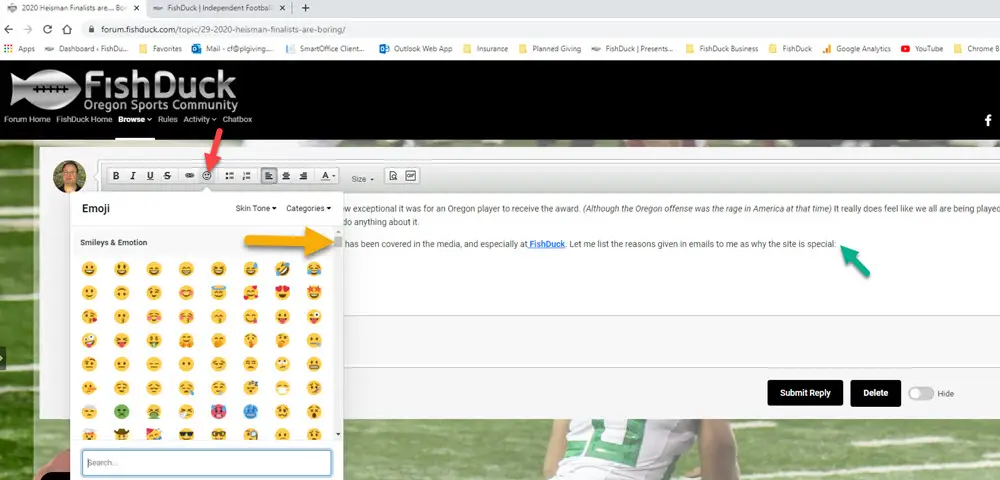
If you wish to place an emoji into a post, first click where you want the emoji, (Green arrow above) and then click on the “face” symbol on the Posting Box toolbar and you can see the menu that drops down. Note also the grey scroll bar in the right, (Yellow arrow) which means you have a ton to choose from. Click on the one you want and the menu will disappear and the emoji will be in the post where you wanted it.
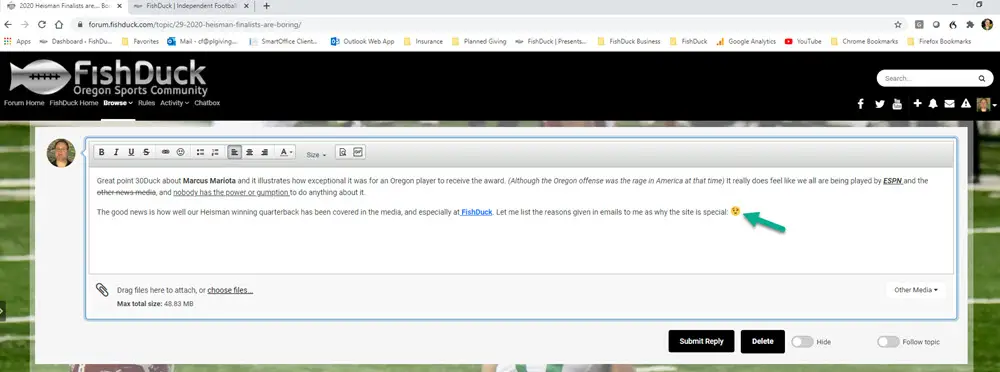
There it is! (Green arrow above) Right where we wanted it…
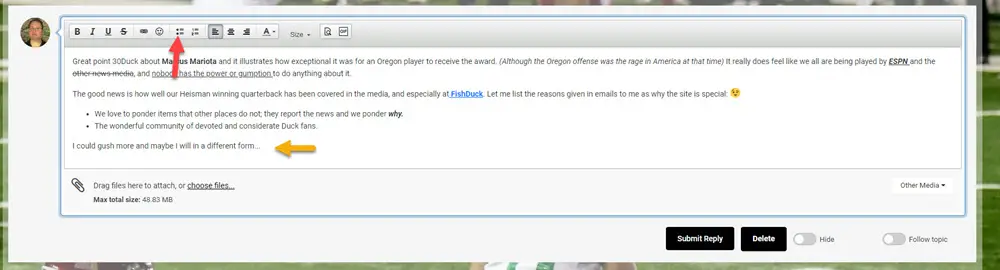
–Insert a Bullet-point list:
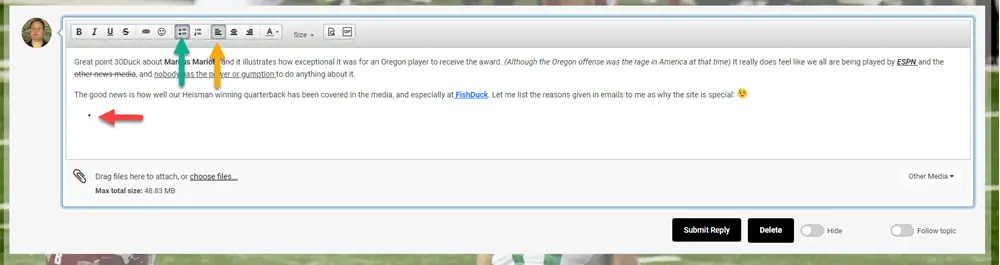
There are times you want to list bullet-points and the symbol to the right of the emoji is for creating or removing a bullet-point list. Click on the symbol (Green arrow above) and the first bullet point will appear (Red arrow above) and ready for you to write. When you are done with that line and hit “Enter” or “Return”…you will be lined up for the next bullet point. Note also the yellow arrow above referring to if you want the list to be on the left side (that is what is marked now) in the center or the right side. That is called justification, so mine is currently left-justified.
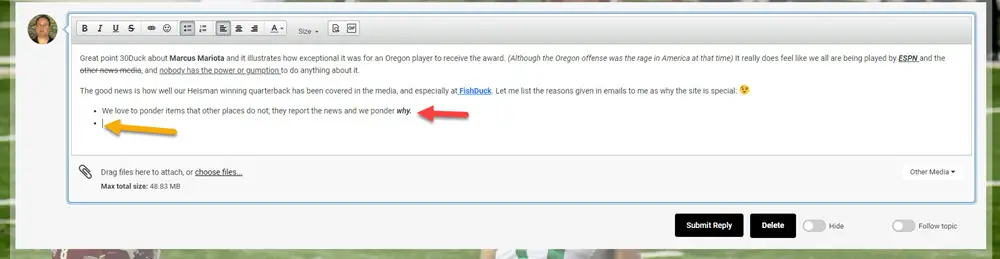
So I wrote my line (Red arrow above) and then hit “Enter” or “Return” on the keyboard to go to the next line and it lined up with the next bullet point in single-space as we want. (Yellow arrow above)
I’ve written all want to, so after my last bullet-point, I go ahead and return it to the next line and it has a bullet placed and ready for the next one. To turn it off I simply clicked on the same symbol that started the bullet-point list and it went one more space and removed the indentation. (Yellow arrow above)
–Creating a Numbered List in Your Post:
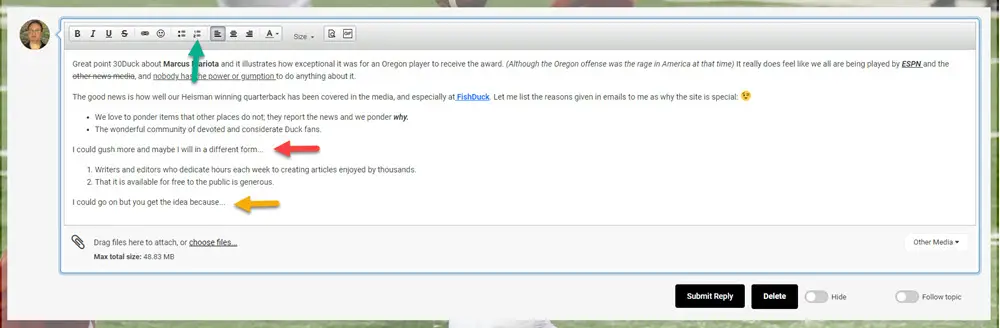
It is a similar process for a numbered list. At the end of my sentence, (Red arrow above) I hit “Enter” or “Return” on my keyboard and when it lined up for the next line–I clicked on the symbol to the left of the “Left-Justify” symbol and it lined up with number one as you see. I wrote one line and hit “Enter” or “Return” on my keyboard to line up the next line it automatically had a number two awaiting for writing.
When I was done I hit “Enter” or “Return” again and when it lined up with a number three, I then clicked the numbering symbol and it turned it off and removed the indentation in order to write a normal sentence as you see with the yellow arrow above.
To remove these? Just highlight and delete or hit the symbol of what you are removing and it will return to the original state.
–Changing the Text Alignment or Justification for effect:
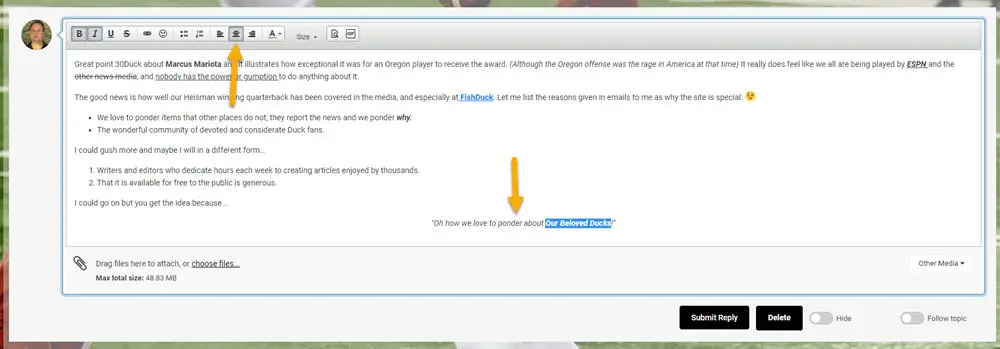
After I returned to the next line… I decided I wanted this next sentence to be short and in the middle of the post. So I can click on the “Middle Justification” button (Top yellow arrow) or I can write the line and highlight it and then click on the middle justification button on the Posting Box toolbar. I use quotes this way to bring more juice to my point and you can make the line in italics as I’ve done and do some bolding as well! Use all the tools for fun…
–Adding color to text!
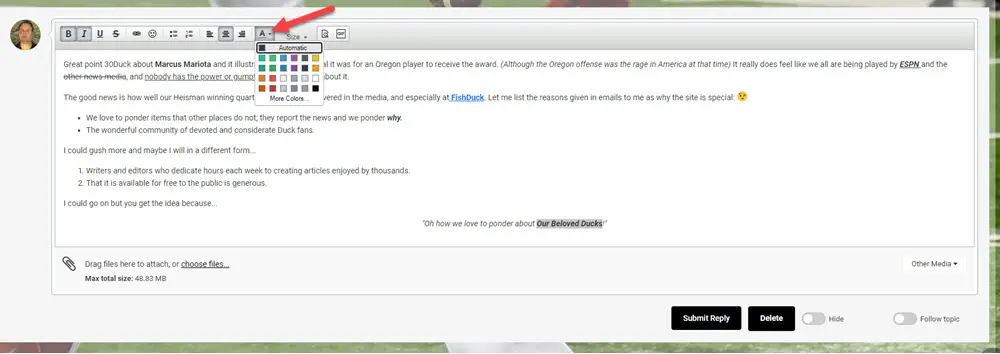
Note how I have Our Beloved Ducks highlighted above and I want to make it a rich shade of green for my post. So after highlighting the words you want a different color, you click on the arrow pointing down, or in other words a drop-down menu next to the “A” and a small selection of colors comes up. If you like any of them, click on the color and then click on any open area in the post and the menu will disappear and the word or words you selected will have the color you want. But what if you want a different color?
In that case you click on the “More Colors…” at the bottom of the color menu.
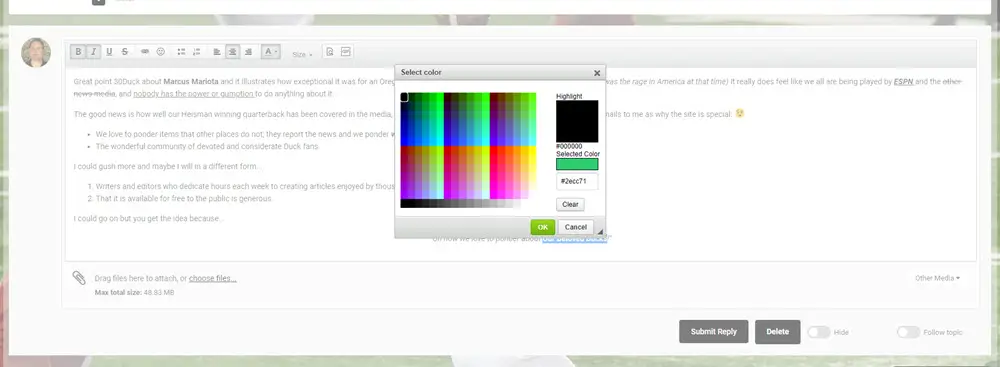
When you do that a color prism appears and you click on a tiny color square , and then click on “OK” and your word or words selected will now have this color. If you don’t like the color, then highlight the word or words again and go through the same procedure. Easy-Peasy! (And kinda fun…)
–Changing Text Size:
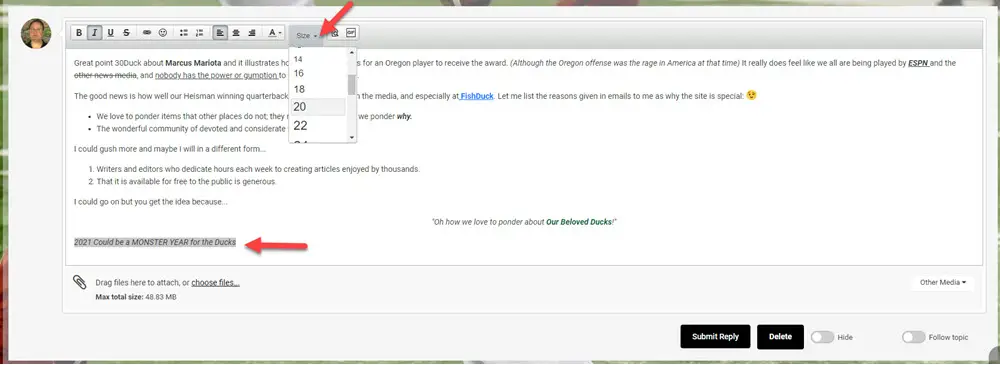
I like to use enhanced subtitles inside of articles or posts and changing the text size does that beautifully. Just highlight the word or word you want to make larger or smaller and then click on the “Size” drop-down menu, (the downward arrow next to Size) and you have a drop-down selection of font sizes. The default or automatic size is 14 for a post and for a subtitle…I want much bigger, so I am selecting size 20 in this example. (Red arrows above) Isn’t this fun?
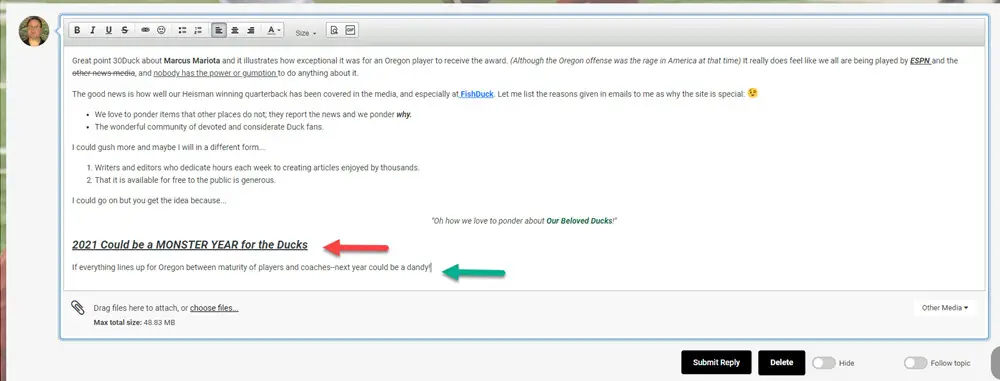
Look at that great subtitle, (Red arrow above) and do know you have to switch things back to normal when you go to the next line. (Green arrow above) Just change the text size back to 14 on the drop down menu before writing, or highlight what you have written on the next line and change the font size in the drop-down menu for “Size.” It is easy and adds a ton to your post and helps to separate your thoughts in a way that is more easily understood by the other members of the forum and community.
–Use the “Preview” Feature!
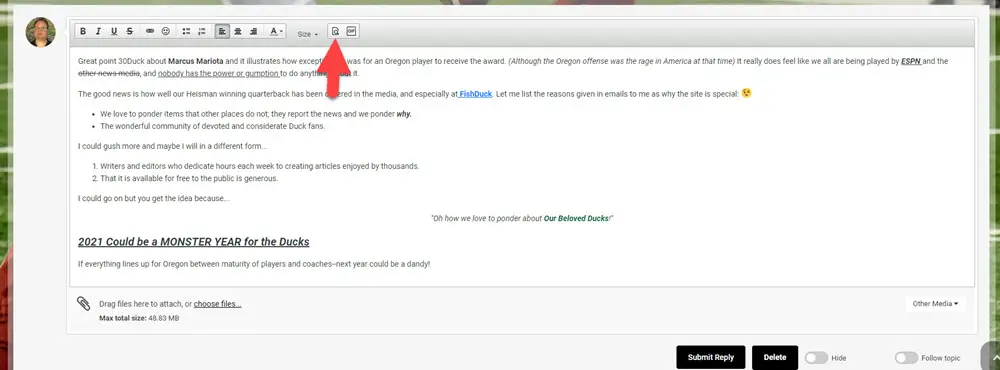
That strange looking symbol on the Posting Box toolbar is the “Preview” feature (Red arrow above) and it will take you to a preview of what your post will look like if you submit it now as it is.

The preview window comes up and allows you to see any mistakes to correct before submitting. To go back to your original post, just click on the “X” in the upper right corner. (Red arrow above)
–Installing a GIF, Picture, Video or Tweet
I will give instructions, but I am a novice at this area and appreciate any feedback and suggestions others may have. I am using the site GIPHY for searching for GIFs although there are others there. You can go there and search and even set up a free account.
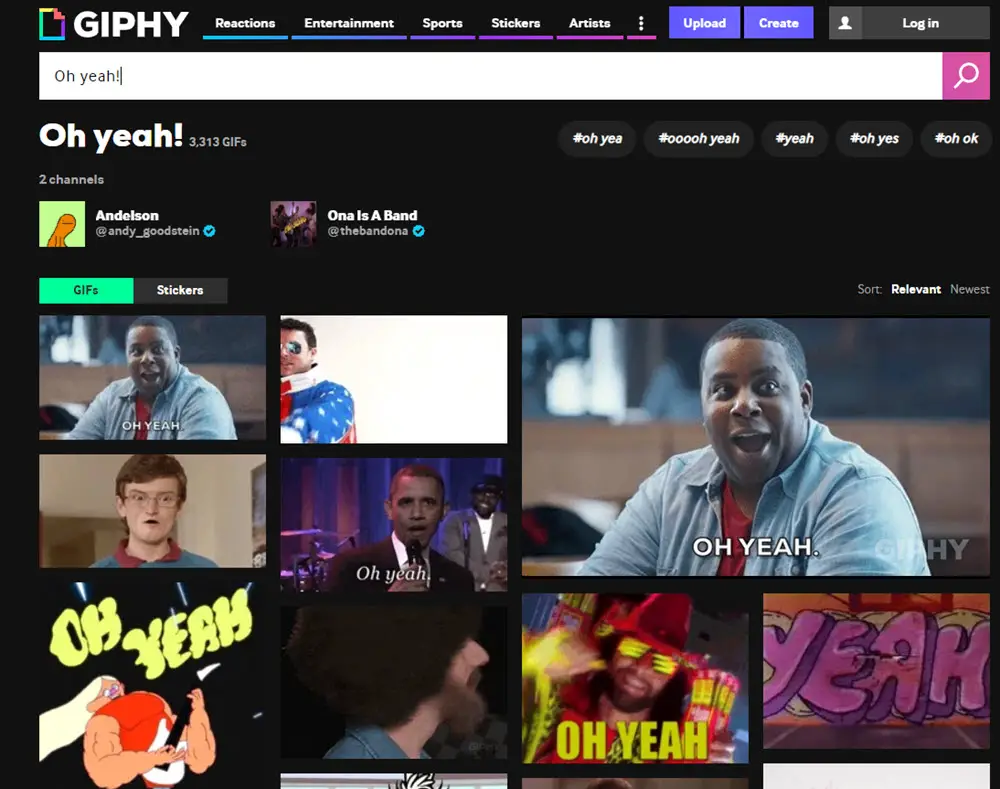
I wanted something to support my notion written of next year being a good year for our football team, so I wrote in the search bar near the top below the title, “Oh Yeah!” to see what materializes.
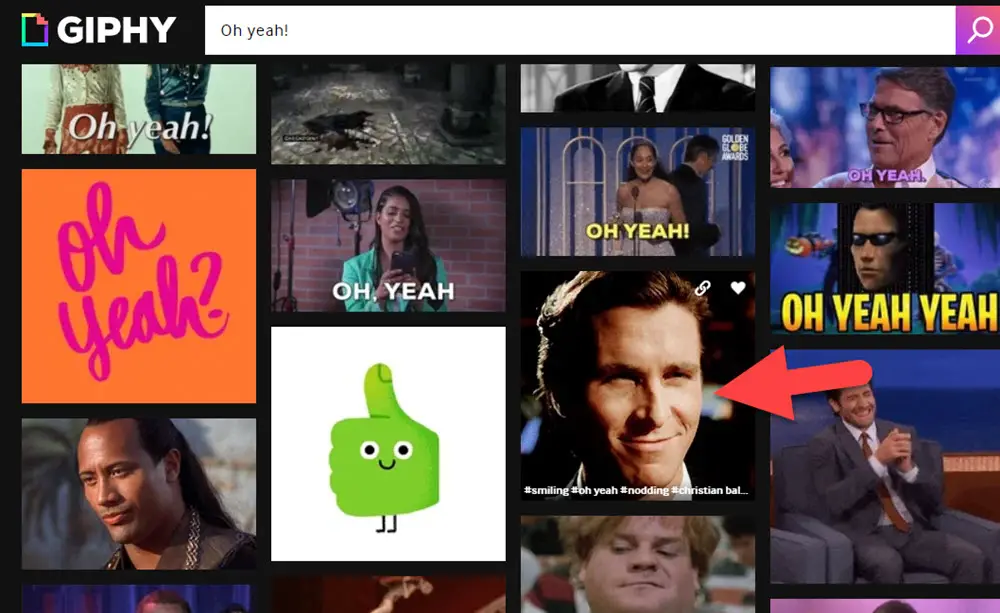
So I found one of Christian Bale nodding that will work for this demonstration, (Red arrow above) and then I clicked on it.
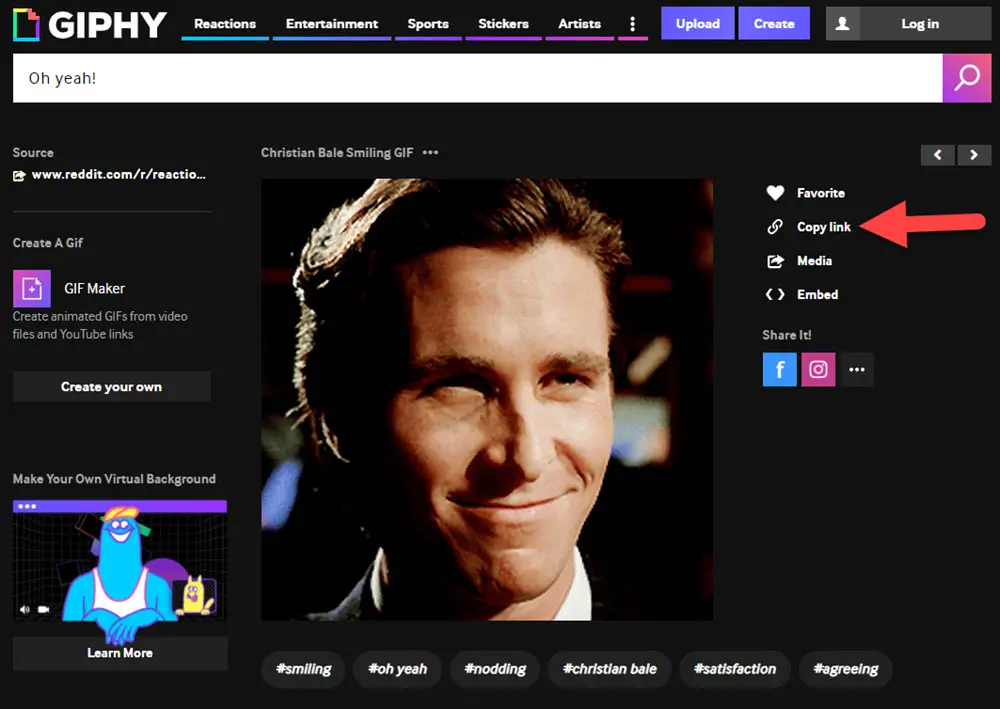
Next, after clicking on his GIF you are taken to a page of the GIF specs and you then click on “Copy link.” (Red arrow above)
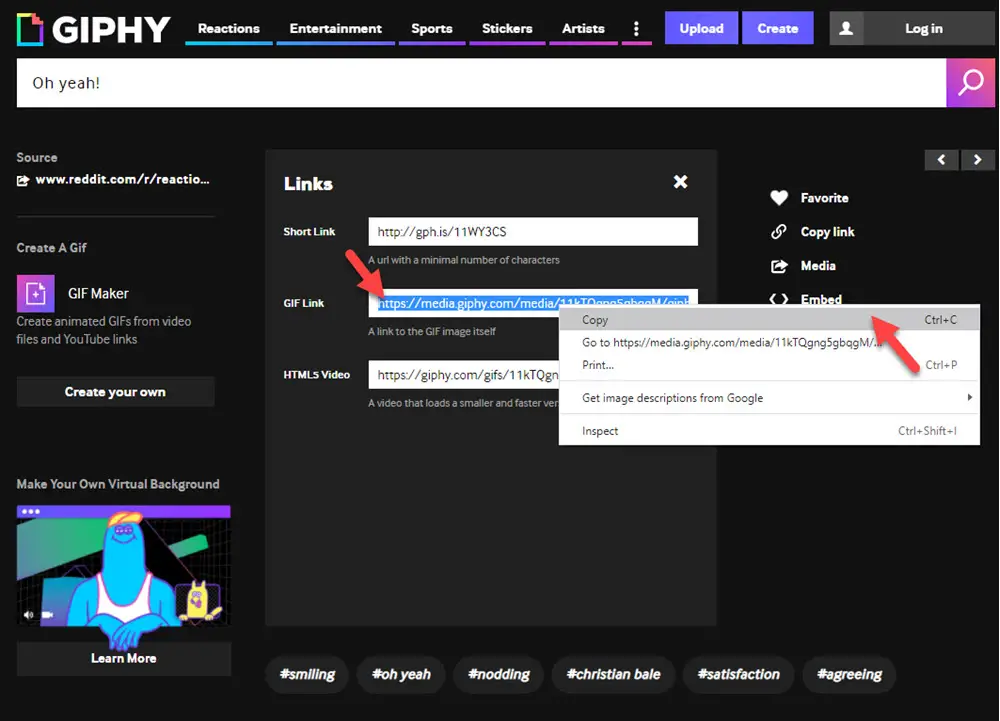
When you click on the “Copy link” a box appears as you see above and all I had to do was left-click in the box with the link and it all highlighted. Now I right-click on the highlighted link and the drop-down menu appears and I click on “Copy.” Or you can click on “Share” and then a colored box appears that states, “Copy GIF Link” and you just click on that it is now copied into your computer.
All I did next was place my cursor in the post and right-click and then select “Paste” and the GIF popped right in! Another time I had a small window come up in the post that told me to click on the Control button in the lower right keyboard and press on the “V” key at the same time and that worked too.
All it takes is a couple of clicks! But wait…there might be another way that is easier?
While I suggest you save GIPHY to your favorites…there is a shortcut right in the Posting Box Toolbar!
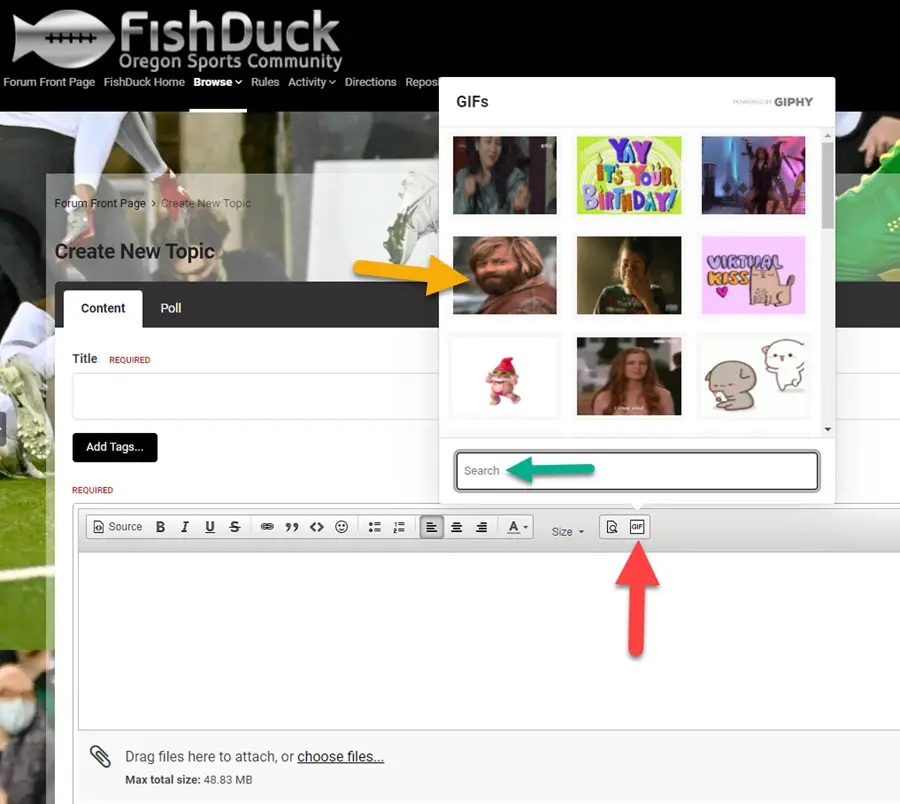
You would click on the “GIF” box in the Toolbar, (Red arrow above) and then a pop-up box appears where you can search for a category, (green arrow above) of pick one of the offered. All I did was click on the “Grizzly Adams” GIF and….
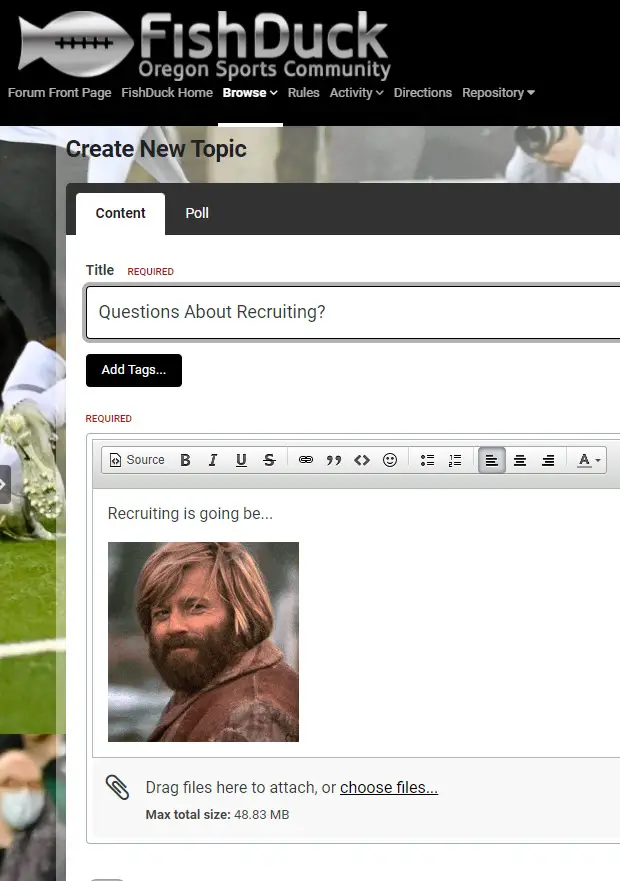
The GIF was automatically installed in my post! Very cool and really easy…
–Installing a Picture:
Installing a picture from your computer is pretty easy, (other picture options below) select where you want the picture (Green arrow above) and then click on the “choose files.” (Red arrow above)
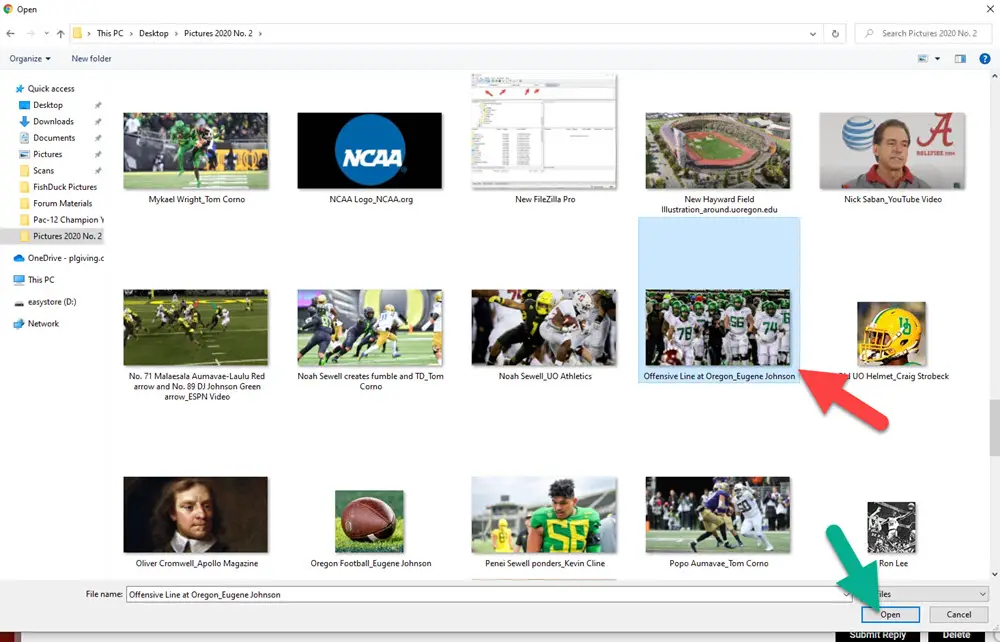
Now you search in your computer for the picture you have saved in the past and click on the picture selected (Red arrow above) and then click on “Open.” (Green arrow above)
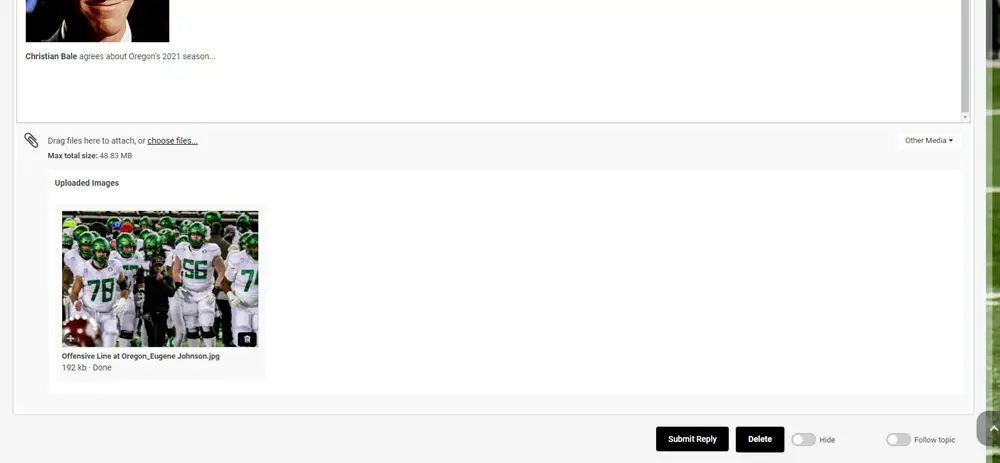
As you see-the picture is loaded into post! I would suggest going into the Post Preview, (see No. 20 above in this page) to check it out in the post. A method for inserting your picture without Submitting or Publishing your reply to check spacing is as follows…
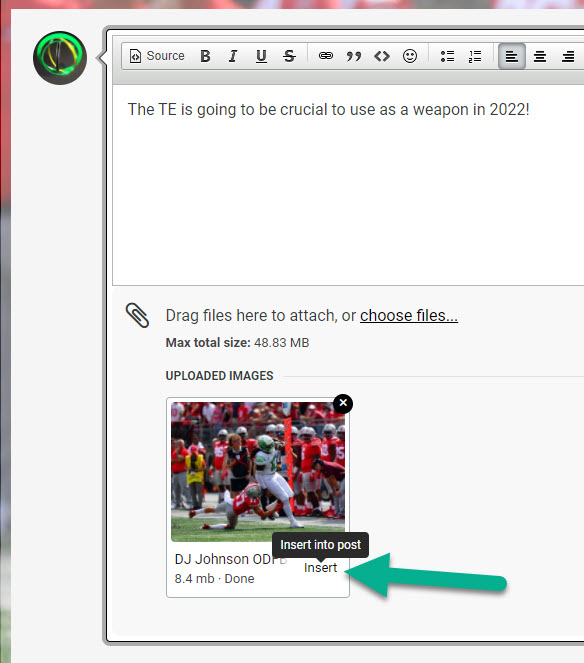
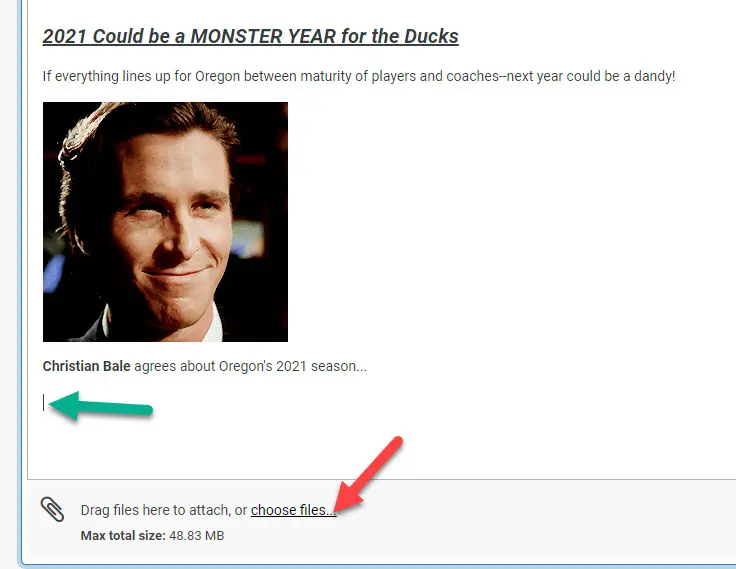
When the picture from your computer file shows up at the bottom of the post…when you hover over this area the word “Insert” shows up. Click on it and…
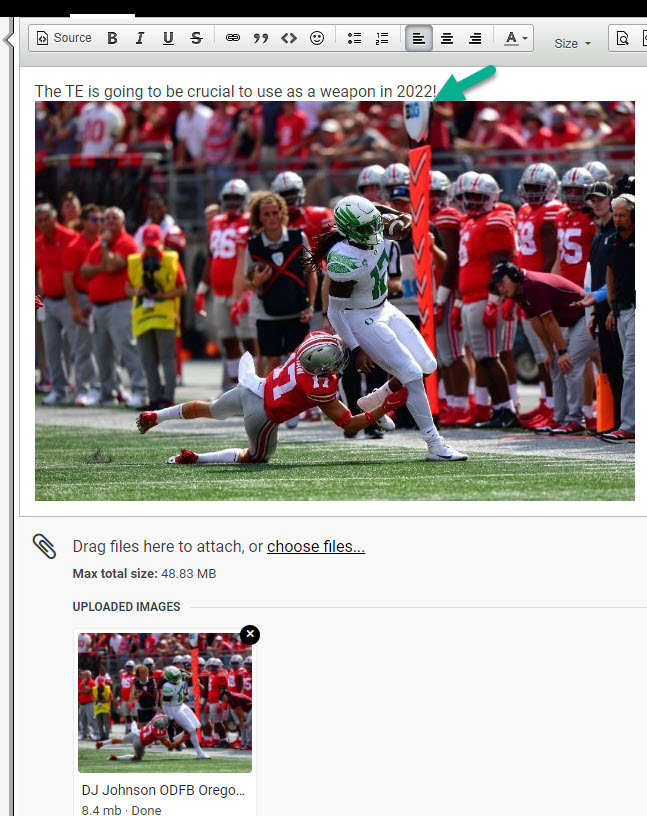
..it will insert it into your post and you can check out the spacing see if anything needs to be done. In my case above, I want to insert another space between the text and the picture by simply placing my cursor at the end of the text and hitting the “Enter” or “Return” key on my keyboard. If I want to place text below the article, I just click on the right side of the picture and then hit the “Enter” or “Return” key again. No sweat!
What about if you do not have a picture? Go to a Google Search page in the right corner are options with one being, “Images,” and click on it. Put the name of your player into the search and I often will add “Twitter” and/or Oregon football and tons of picture will turn up.
Right click on any of them and “Copy” and the come back to your post and “paste” right into it! Adding a picture this way takes seconds, and makes your post so much richer. No worries about copyright laws in a forum like this, as I cannot do this with FishDuck articles, but anyone can do this in a forum and it is legal.
–Installing a Video:
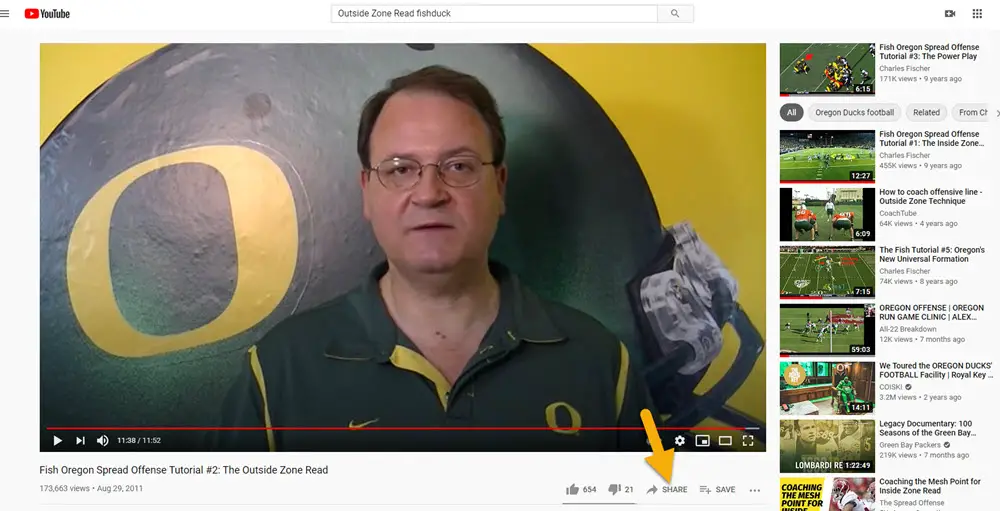
The first step is to select the video you wish to install after searching among those on YouTube. (Above) Then select the point you would like the video to start as you can do that and I suggest it. Have it stopped at the spot you would like it to start. Then, click on “Share” as you see pointed to by the yellow arrow above.
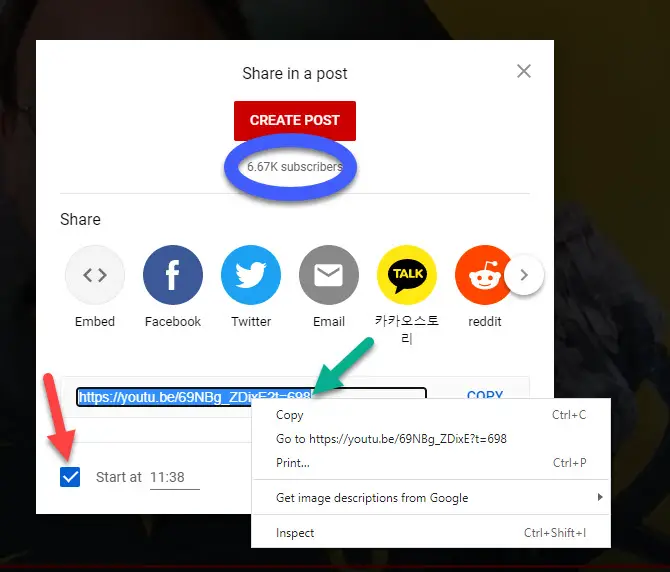
When you click on the “Share” button a box pops up; since I want it to start at the 11:38 mark, I check the box indicated by the red arrow first, so it becomes part of the link I am going to copy.
Then left-click in the box with the code, (Green arrow above) and it becomes highlighted; you can then click on the “Copy” you see to the right or right-click on the code (link) and select “Copy” and now you have the link.
The final step is right-clicking in your post and selecting “Paste” from the drop-down menu and the video loads in there! Just a couple of clicks, but knowing what to click is everything and now you know!
–Installing a Twitter Tweet:
If you see a tweet you like, then you must get to the original tweet itself by the person who created it. That means clicking on the bird symbol and then clicking downward into the original tweet that was re-tweeted.

In this case I clicked on the tweet as you see with the red arrow above…
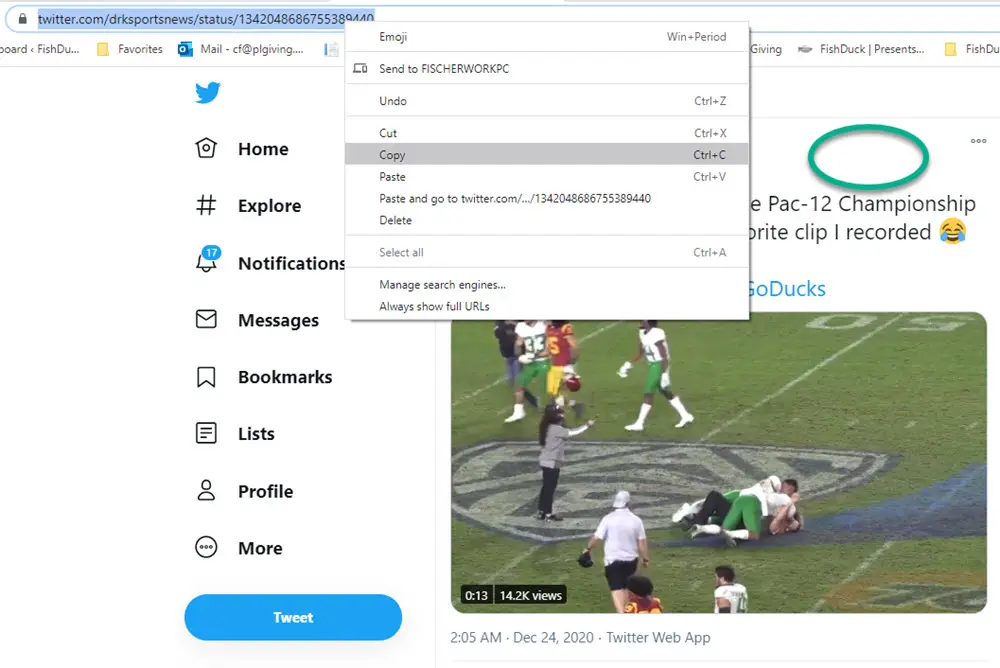
That is the tweet with the video I want. First, click on the tweet in any open area, (Green circle above) and then left-click on the URL address as you see it becomes highlighted, then right-click on the highlighted URL and select “Copy” from the drop-down menu. (If the URL is very long and goes beyond your sight, go ahead and click on it anyway and it will automatically become highlighted and you can still copy it, as I do it every day!)
Next, go to the post and right click in the post where you want it and select “Paste” from the drop-down menu and it will install!
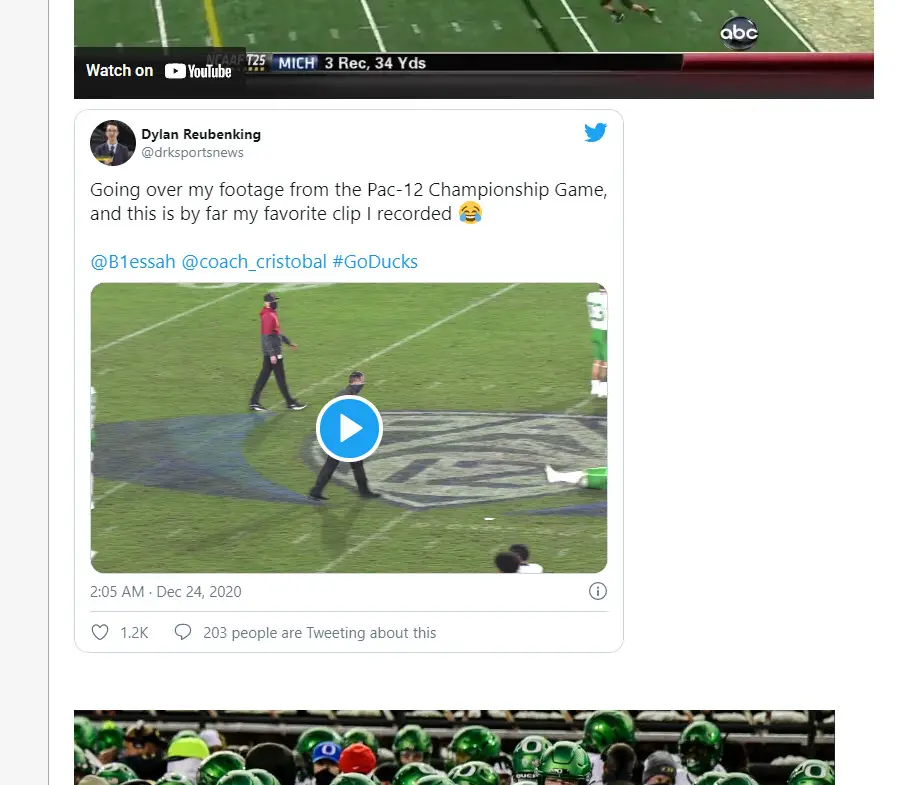
Above is the GIF, the Twitter and the photo and all the items we demonstrated in this string! The post can be found right here with all the items detailed on this page.
Understanding and Using the “Quote” Process to Engage in GREAT Discussions
Some threads go very long and you want to respond to one post that is ten posts above you; how do indicate it is that one you are referring to? Through the use of the “Quote” mechanism. This section will go into all the ways that you can respond to one sentence in one post or multiple sentences in many posts. Let’s learn how because it creates stellar conversations…
–How to copy a quote of one sentence or a fragment from another post and place it in yours:
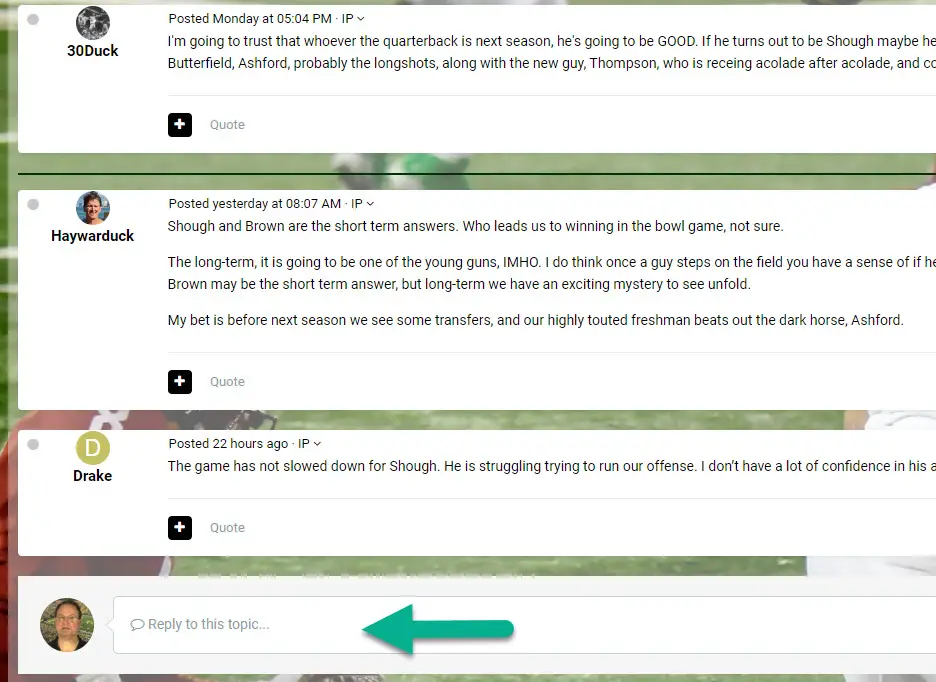
OK, I am at the end of a string of replies and want to respond to a specific sentence or part of a sentence; how do I do it? Above is the typical box ready for you to reply with…
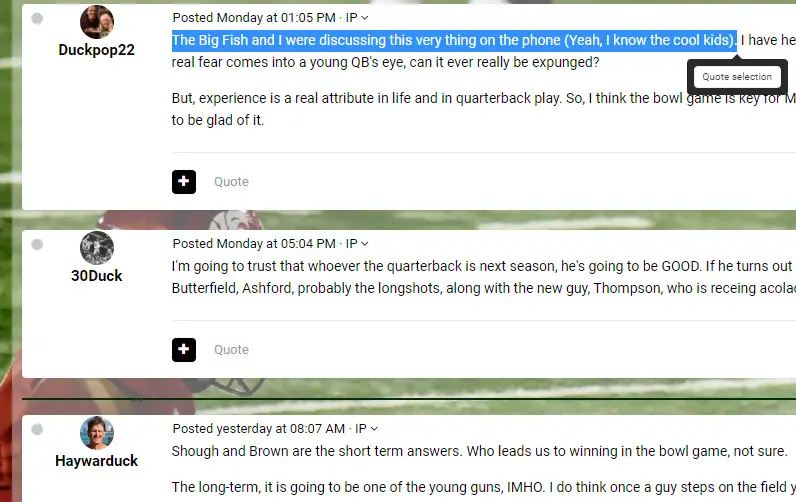
I know that rascal Duckpop22 really well and we howl in laughter often on the phone. He made some great points in his post, but I wanted to pull one sentence out and respond to it. See what I did above? I left-clicked and dragged across what I want to appear in my post to respond to, and when I let go of the left click at the end of the sentence….the little box of “Quote selection” appeared.
You click on it and it will appear in your post!
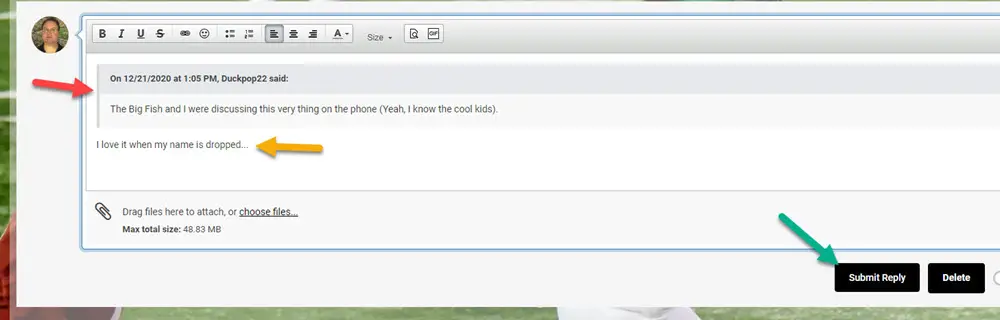
Well look at that above, as the quote appears and it credits who wrote it for better identification as to which post I am responding to. (Red arrow above) So I write my reply to his post (Yellow arrow above) and then submit it. (Green arrow above) That is how we insert one sentence or a fragment of a sentence from any post into your own to write about or respond to. Easy!
–26. Putting Quotes of single sentences or fragments from several posts into your Post:
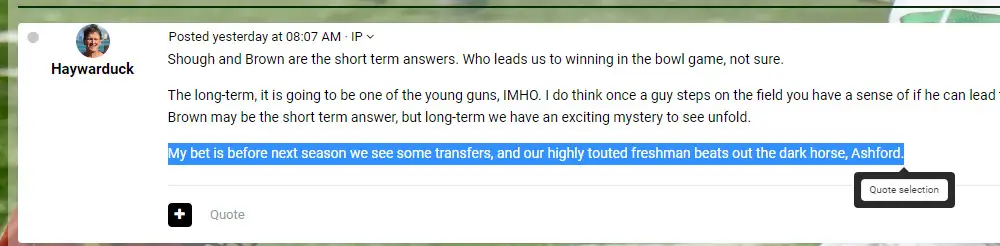
What you see above we have already done, but I applied the same process to three different posts to bring a single sentence of each into my one post.
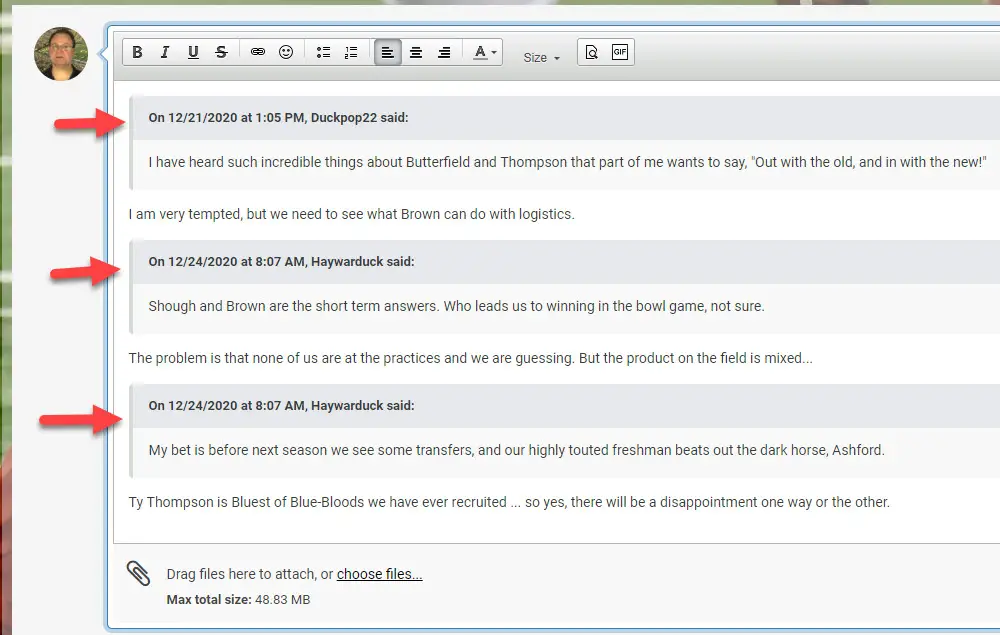
Whoa…look at that. I have quotes from three different posts and wrote a response to each. So you can parse out particular sentences or sentence fragments from one or several posts and have them placed in your post. Very cool…
–27. Placing an entire post as a quote into your Post:
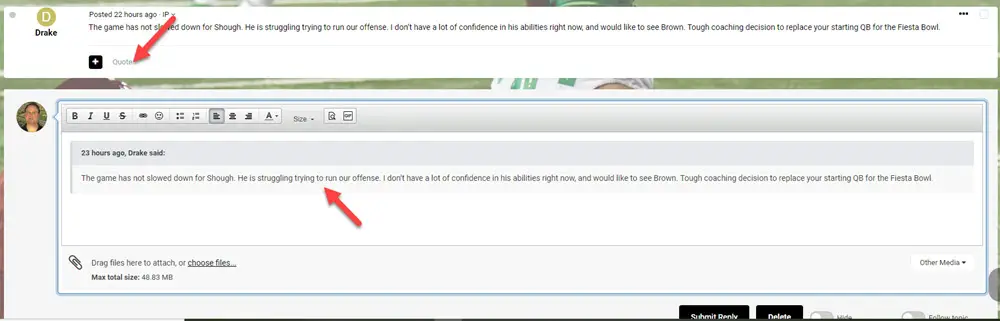
My FishDuck Friends….it doesn’t get any easier than this! You simply click on the “Quote” in the post you want brought into your own, (Top red arrow above) and it appears in your post in it’s entirety. (Lower red arrow above) Only one click!
–28. Putting multiple complete posts inside of your post:
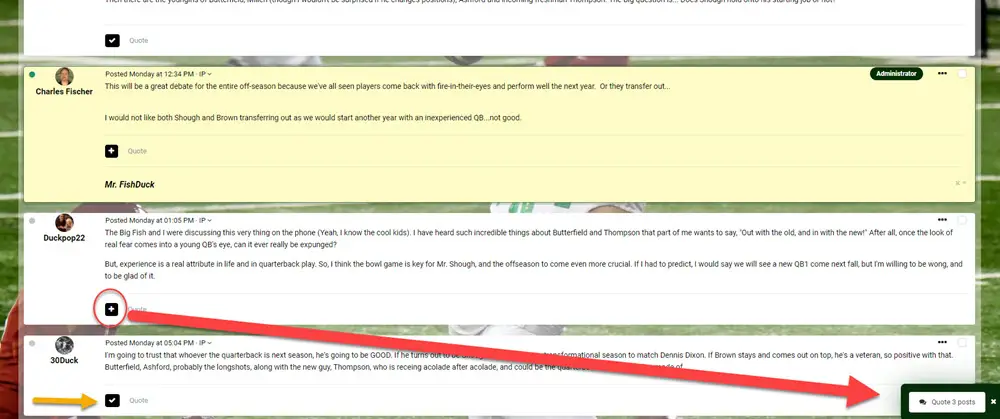
See that plus sign in a black square above? (Red circle) If you click on that, the entire quote is placed in your post along with any others that you select. When you select one it looks like a check-mark inside the black square as you see at the yellow arrow above. (I clicked on three of them for entire posts to placed in my post as quotes)
Click that black box in the lower right, (Quote 3 posts) and all three are now placed in your post. Believe it?
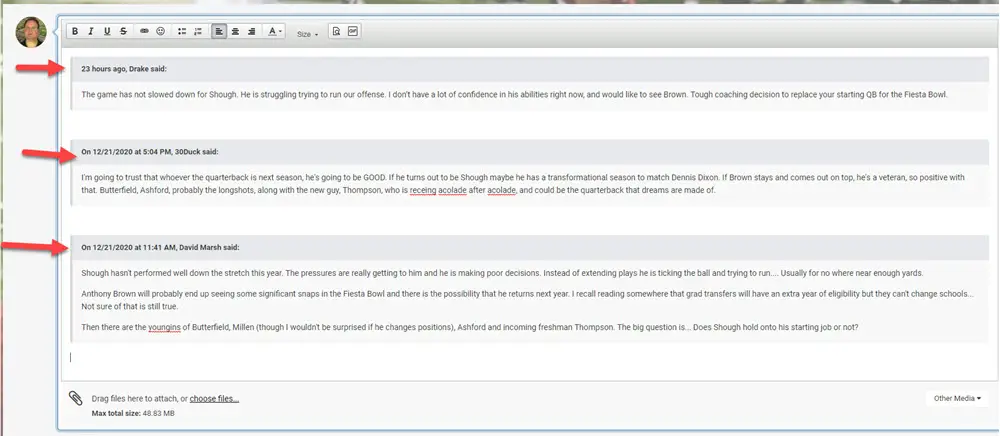
Wow … there they are! I did not write my responses yet, but you see how easy this is. Very, very cool and when a thread gets really long with tons of posts–you can hone in and discuss particular components of the posts of your choice. All with a couple of clicks is all!
We want to stay on topic within the threads, but you know how you get certain subset topics that morph from the discussion and this is a nicely devised software feature that will help everyone.
—————————————————————————-
This was the mother-of-all-instructional-pages, but it is also very valuable. I will make a promise to you…however amount of time you put into learning this … I put in a ton more time in learning it, crafting a plan for explaining it and then spending the 20 hours to have it all available to everyone. What will take people minutes to learn took me hours to present and my earnest wish is that members take full advantage of the only complete guide of instructions for a forum.
It is all created so that…“Oh, how we can love to ponder about Our Beloved Ducks!”
Charles Fischer (Mr. FishDuck)
Eugene, Oregon